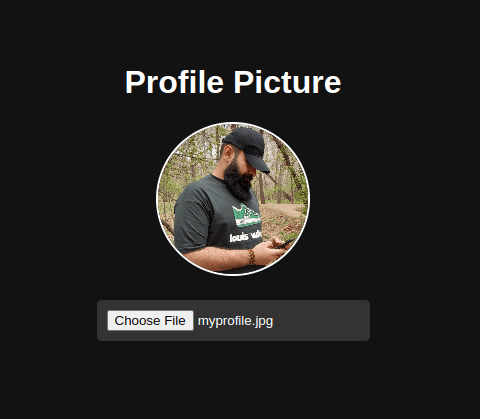
In this tutorial, we’ll walk through creating a modern, dark-themed profile picture upload and crop feature using JavaScript. This guide is perfect for front-end developers looking to enhance user experience with an interactive image upload tool. We’ll use HTML, CSS, and JavaScript along with the Cropper.js library to achieve this. Let’s break down the process step by step.
Table of Contents
Step 1: Setting Up the HTML
First, we need to set up the basic HTML structure of our web page. This includes the placeholder for the profile picture, a file input for selecting images, and a modal for cropping the image.
<!DOCTYPE html>
<html lang="en">
<head>
<meta charset="UTF-8">
<meta name="viewport" content="width=device-width, initial-scale=1.0">
<title>Profile Picture Upload</title>
<link rel="stylesheet" href="styles.css">
<link href="https://cdnjs.cloudflare.com/ajax/libs/cropperjs/1.5.12/cropper.min.css" rel="stylesheet">
</head>
<body>
<div class="container">
<h1>Profile Picture</h1>
<div class="profile-pic">
<img id="profileImage" src="https://via.placeholder.com/150" alt="Profile Picture">
</div>
<input type="file" id="imageUpload" accept="image/*">
</div>
<div id="cropModal" class="modal">
<div class="modal-content">
<span class="close">×</span>
<div id="crop-container"></div>
<button class="crop_and_save" id="cropButton">Crop and Save</button>
</div>
</div>
<script src="https://cdnjs.cloudflare.com/ajax/libs/cropperjs/1.5.12/cropper.min.js"></script>
<script src="scripts.js"></script>
</body>
</html>
Explanation:
- DOCTYPE and HTML Structure: We start with the
<!DOCTYPE html>declaration to define the document type and HTML version. - Head Section: This includes meta tags for character set and viewport settings, a title, and links to our CSS files. We link to an external stylesheet
styles.cssfor our custom styles and the Cropper.js CSS file for cropping functionality. - Body Section:
- A
divwith a class ofcontainercontains all our elements. - An
h1tag for the page title. - A
divwith a class ofprofile-piccontaining animgtag for the profile picture. The image source is set to a placeholder image. - An
inputof typefilefor uploading images, accepting only image files (accept="image/*"). - A modal (
divwith idcropModal) containing the crop container and a button to save the cropped image. This modal will be displayed when the user selects an image.
- A
- Scripts: We include the Cropper.js library and our custom JavaScript file (
scripts.js) at the bottom of the body for better performance.
Step 2: Styling with CSS
Next, we style our web page to give it a modern, dark theme. This includes styling for the container, profile picture, file input, and modal.
       /* styles.css */

        body {
            background-color: #121212;
            color: #ffffff;
            font-family: 'Arial', sans-serif;
            display: flex;
            justify-content: center;
            align-items: center;
            height: 100vh;
            margin: 0;
        }

        .container {
            text-align: center;
        }

        .profile-pic img {
            width: 150px;
            height: 150px;
            border-radius: 50%;
            border: 2px solid #ffffff;
        }

        input[type="file"] {
            margin-top: 20px;
            padding: 10px;
            background-color: #333;
            color: #fff;
            border: none;
            border-radius: 5px;
            cursor: pointer;
        }

        input[type="file"]:hover {
            background-color: #444;
        }

        .modal {
            display: none;
            position: fixed;
            z-index: 1;
            left: 0;
            top: 0;
            width: 100%;
            height: 100%;
            overflow: auto;
            background-color: rgb(0, 0, 0);
            background-color: rgba(0, 0, 0, 0.4);
            justify-content: center;
            align-items: center;
        }

        .modal-content {
            background-color: #2c2c2c;
            padding: 20px;
            border: 1px solid #888;
            width: 80%;
            max-width: 600px;
            margin: auto;
            text-align: center;
        }

        .close {
            color: #aaa;
            float: right;
            font-size: 28px;
            font-weight: bold;
        }

        .close:hover,
        .close:focus {
            color: #fff;
            text-decoration: none;
            cursor: pointer;
        }
        .crop_and_save {
            margin-top: 15px;
            padding: 10px;
            cursor: pointer;
            border-radius: 5px;
            border: none;
        }
        .crop_and_save:hover {
            background: #1f1e1e;
            color: #fff;
        }
Explanation:
- Body Styles: We set the background color to a dark shade, text color to white, and use a sans-serif font for a modern look. The body is displayed as a flex container to center the content both vertically and horizontally.
- Container: The
text-align: center;property centers the text within the container. - Profile Picture: The image is styled to be circular using
border-radius: 50%;, with a white border for better visibility. - File Input: The file input is styled to blend with the dark theme, and changes color slightly when hovered over.
- Modal: The modal is hidden by default (
display: none;). When displayed, it covers the entire screen with a semi-transparent background to focus attention on the modal content. - Modal Content: Styled with a dark background, padding, and centered text. The close button is styled to be prominent and changes color on hover.
Step 3: Adding Functionality with JavaScript
Finally, we add JavaScript to handle the image upload, cropping functionality, and updating the profile picture.
    imageUpload.addEventListener('change', function (event) {
        const file = event.target.files[0]; // Get the selected file
        if (file) {
            const reader = new FileReader(); // Create a new FileReader
            reader.onload = function (e) {
                if (cropper) {
                    cropper.destroy(); // Destroy the previous Cropper instance if it exists
                }
                // Set the uploaded image as the source for a new image element
                cropContainer.innerHTML = `<img id="cropImage" src="${e.target.result}">`;
                const cropImage = document.getElementById('cropImage'); // Get the reference to the new image element
                // Initialize Cropper.js on the new image element
                cropper = new Cropper(cropImage, {
                    aspectRatio: 1, // Maintain a square aspect ratio
                    viewMode: 1 // Restrict the crop box to not exceed the size of the canvas
                });
                cropModal.style.display = 'flex'; // Show the modal as a flex container
            };
            reader.readAsDataURL(file); // Read the file as a data URL
        }
    });
JavaScript Detailed Explanation
Now let’s break down the JavaScript part in detail. We’ll go through each section of the code, explaining what it does and how it contributes to the functionality of the web page.
Step 1: Wait for the DOM to Load
document.addEventListener('DOMContentLoaded', function () {
    // All code inside here runs only after the DOM is fully loaded
});
Explanation:
- We use this code
- to ensure that our script runs only after the entire DOM is fully loaded. This prevents errors that might occur if the script runs before the elements are available.
Step 2: Get References to HTML Elements
const imageUpload = document.getElementById('imageUpload');
const profileImage = document.getElementById('profileImage');
const cropModal = document.getElementById('cropModal');
const cropContainer = document.getElementById('crop-container');
const cropButton = document.getElementById('cropButton');
const closeModal = document.getElementsByClassName('close')[0];
Explanation:
- We use
document.getElementByIdanddocument.getElementsByClassNameto get references to the various HTML elements we will interact with.imageUpload: The file input for uploading images.profileImage: The placeholder image element that will be updated with the cropped image.cropModal: The modal that will display the cropper.cropContainer: The container within the modal where the selected image will be displayed for cropping.cropButton: The button to save the cropped image.closeModal: The span element to close the modal.
Step 3: Handle Image Upload
let cropper;

imageUpload.addEventListener('change', function (event) {
    const file = event.target.files[0];
    if (file) {
        const reader = new FileReader();
        reader.onload = function (e) {
            if (cropper) {
                cropper.destroy();
            }
            cropContainer.innerHTML = `<img id="cropImage" src="${e.target.result}">`;
            const cropImage = document.getElementById('cropImage');
            cropper = new Cropper(cropImage, {
                aspectRatio: 1,
                viewMode: 1
            });
            cropModal.style.display = 'flex';
        };
        reader.readAsDataURL(file);
    }
});
Explanation:
- We add an event listener to the file input (
imageUpload.addEventListener('change', ...)) to handle the image upload.const file = event.target.files[0];: We get the selected file.const reader = new FileReader();: We create a new FileReader object to read the file.reader.onload = function (e) { ... };: We define what happens once the file is read.if (cropper) { cropper.destroy(); }: If a cropper instance already exists, we destroy it to avoid conflicts.cropContainer.innerHTML =<img id=”cropImage” src=”${e.target.result}”>;: We set the innerHTML of the crop container to display the uploaded image.const cropImage = document.getElementById('cropImage');We get the reference to the newly created image element.cropper = new Cropper(cropImage, { ... });: We initialize Cropper.js on the image with the specified options.cropModal.style.display = 'flex';: We display the modal as a flex container, ensuring it takes advantage of flexbox properties for alignment and positioning.
Step 4: Handle Cropping and Saving
cropButton.addEventListener('click', function () {
    const canvas = cropper.getCroppedCanvas({
        width: 150,
        height: 150
    });
    profileImage.src = canvas.toDataURL();
    cropModal.style.display = 'none';
});
Explanation:
- We add an event listener to the “Crop and Save” button.
const canvas = cropper.getCroppedCanvas({ ... });: We get a cropped version of the image as a canvas element. The dimensions are specified as 150×150 pixels.profileImage.src = canvas.toDataURL();: We convert the canvas to a data URL and set it as the source of the profile image element.cropModal.style.display = 'none';: We hide the modal once the cropping is done.
Step 5: Handle Modal Close
closeModal.onclick = function () {
    cropModal.style.display = 'none';
};

window.onclick = function (event) {
    if (event.target === cropModal) {
        cropModal.style.display = 'none';
    }
};
Explanation:
- We handle closing the modal in two ways:
closeModal.onclick = function () { ... };: This sets an event listener on the close button (span) to hide the modal when clicked.window.onclick = function (event) { ... };: This sets an event listener on the window to hide the modal if the user clicks outside the modal content.
By following this detailed breakdown, you should now have a good understanding of how to implement a profile picture upload and crop feature using HTML, CSS, and JavaScript. We’ve leveraged the Cropper.js library to handle image cropping, providing a smooth and interactive user experience. This example demonstrates how to manage file uploads, implement a cropping tool, and dynamically update the user interface. Happy coding!
You can find more JavaScript tips and tricks in our CSS/JS Tricks Category.


